SDK or Set Driven Key is very similar to the constraint tools, but is very specific and adjustable. Following an example below, what happens here is when the sphere has its position adjusted across the Y-Axis; the cube will rotate against the Y-Axis.
This is great for a cause-affect situation. You can adjust how much the Driver affects the Driven.
Wednesday, 30 November 2016
Constraints
Creating Contraints,
This makes models be affected be affected by transformations of other transformations.
I have played with all the Create-Constrain tools to see how they affect each other. For example the aim constraint that makes a model constantly face another model, no matter its position. Other tools do things such as:
Model rotated at the same degree difference as another model constrained to it.
Model is fixed perfectly between two other models no matter where they are translated.
Model has its scale changed dependant on another models scale.
of all these constraint tools my favourite was Point. This made it so a model is fixed perfectly translated between two others. I used six spheres to create an almost slug model. This used with Aim could work really well to create an animation about a snake or any long bodied animal.
Wednesday, 23 November 2016
Rigging and Skinning
Rigging and Skinning is a way to almost add a bone structure to a model and manipulating the structure so the right parts move in the correct way when adjusted.
The hand below started spread without the blue wires you can see below within the hand.
To create the Rig (blue spines) got to animation mode and then Ridding>Skeleton>Create Joints Tool,
While creating the joints you may notice they are all in one flat plane. This will be because they do not know where to auto fix. So once all rigs have been created just adjust the translation to fit accordingly to how you want it. In the exercise we had to create multiple joints from a single branch. This meant using the Oueliner from the windows tab and selecting where to add an extra rig from.
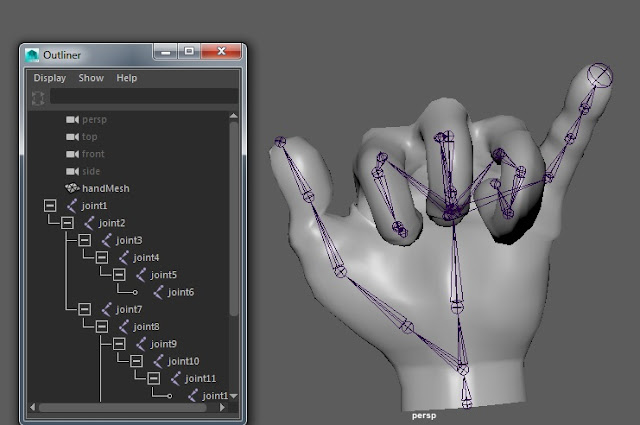
Once the Rigging has been completed it is time to Skin. Like i said previously the skinning is to allow proper manipulation of the model as desired by the creator. To access this select rig and then the model and proceed to select Skin>Interactive Bind Skin.
At this point you can select different parts of the rig to see a heat map and adjust it to your liking. Your able to adjust how much the rig can be manipulated and the area .
Red = Heavily manipulated
Orange = Very manipulated
Yellow = Slightly manipulated
Green = Hardly manipulated
Blue = Not manipulated
Once completed I wanted to show my skills and make a hand with a thumbs up. Unfortunately the model hand could not support this as it is a very old example.
Camera Angles and Cinematography
While using a camera to create shots you often have to think of perspective and a hierarchy of how the character of scene shot works. With this comes many rules and multiple types of camera shots to learn and how they can be used effectively. Whether it's the low angle from a giant to a smaller character or a reverse tracking shot on a subject to exaggerate the expanse of their surroundings.
This image to the left really helps to give a simple understanding of the key terminology.
- Pan - Moving the camera along the X axis.
- Tilt - (Imagining the camera is on a fixed stand such as a tripod) Rotating the camera up and down from a fixed point.
- Dolly - Moving the camera as an object without zooming.
- Tracking - Moving the camera left or right, like it was attached to a track.
- Crane - Having the camera attached to something off of the ground.
Below is a link to show all the different camera shots available.
http://www.empireonline.com/movies/features/film-studies-101-camera-shots-styles/
Wednesday, 16 November 2016
Bouncing Ball Tutorial
I was given the task of following the grid below. It shows frame by frame of how to animate a bouncing ball.
The idea was to make a key frame as every numbered point where there was a filled black circle. But there were issues in animating it regarding rotation to to polish the animation I also added a single frame before and after the ball makes contact with the floor (frames 6, 8, 16, 18, 24, 26 and 30).
Following the tutorial was really easy and simple but helped me get around how the key frames worked. Issue I had was that on occasion I would manipulate the sphere to fit in with the next key frame and I would have forgotten initially to select the frame I wanted use.
I also added flat cube surface as a floor so when viewing to was easier to see the points of bounce.
Here is the graph editor of the bouncing ball example.
You can see the bouncing ball follows the green line that curves up and down. After finishing the last key frame I had improved this line so it followed the path to a higher quality.
Handles
Handles allow the manipulation of objects to become a lot easier. Using grouping in the Outliner, I have made the cone and sphere a child of the 2D circle found in 'curves/surfaces'. Now if I select the cone or sphere an manipulate either it will happen separately, but if i manipulate the circle both the cone and sphere will be manipulated along with it.
- Create 2 separate objects.
- Create the 2D circle.
- Open the outliner, select both 3D objects created in the first step and drag to the 2D circle in the outliner using the middle mouse button.
Thursday, 10 November 2016
Houston, we have a problem.
Upon inspection of my models, I wanted to make final tweaks here and there to perfect each one. When I opened up Maya 2016 for mt TIE-Fighter I saw this mess in the engine area. For an odd reason once I had saved everything it had messed with my edges and vertices to create this mess. I have edited it since to clean it up. But this is a noteworthy issue.
Wednesday, 9 November 2016
Multiple Extrudes
Extruding Multiple Faces
While creating my models I had acquired a love for the extruding tool as it made it very easy and simple to manipulate simple objects into more complicated ones. Previous to this example I was not completely sure how to create the 2 extruding faces equally. But using the connect tool between the above and below edges I could cut a perfect middle edge to separate the faces. Once I had done that I extruded a smaller face into both faces and used the vertices to make them equal. Once equal I highlighted both faces I wanted to extrude and performed the extrusion.
Tuesday, 8 November 2016
Boolean Difference Manipulation
I had realised there were 4 vents in each side piece of the Star Destroyer and wanted in semi-circular edge or cut into the object but was not sure how to do so.
My first attempt was to place a cylinder and then a cube inside of that where I would rotate the cube to cut away more than just from top to bottom but across the edge. I found this did not work at all and left straight edges inside that looked very messy.
My second attempt was to replace the cube with another cylinder so the other cut was rounded also. The end product left an almost figure '8' shape across the object and looked messy once again.
My third and final attempt was a success. Rather than using 2 object to cut, i would just manipulate the single one. By selecting a semicircle in the top face and translating it across it created the perfect effect for what i wanted to but cut out of my object.
Moving and Scaling Multiple Objects
TIE-Fighter Duplicate Wings
Initially I had just duplicated all the object required to create the wing for the purpose of having two symmetrical wings and saving the time of re-creating everything from scratch. Only issue I had from this was that all the object would rotate separately and would be muddled all over the screen rather than staying attached in the correct areas.
Above is the final example of how i had done this.
I have gone to Windows > Outliner and selected all the objects making the one wing.
Once that was done and all objects were highlighted in the outliner I used Ctrl + G to group these objects together.
This made it so when I edited the models from the group window, all objects would be edited respectively of where they were and how they were according to its arrangement.
So I duplicated the group from the outliner and from the attribute editor I had scaled it to -1 along the x-axis. This made it so the group was rotated perfectly 180 degrees and was easily translated into its correct position.
Monday, 7 November 2016
Cut or Connect
Using the cut or connect tool can add extra polygons to enhance you model. In the image below I am cutting a line allowing me to create an indented face a window effect.
Boolean with an Extrude
Construction of an odd shape
Before I begin I wonder what basic shape to start with. If I see a shape with a circle I will almost certainly use a cylinder or sphere as the start shape. So I had placed it correctly according to the image plane and then I noticed I wanted a flat side to be pulled up with vertices pulled closer together. So I would use a simple cube shape to cut the clean surface out and continue just as previously stated. But it needed an inner circle extruded inside itself and that took priority as there would be a face issue to extruded inwards an circle if the face was not a circle.
From the example above you can see the end result. I have given a visual example of what i had done to create the top area of the cylinder.
- Extrude another circular face into the cylinder.
- Cut a cube out of it (shown by a grey box).
- Extrude the upper flat surface up and transform the vertices closer together on the x-axis.
- Push the smaller circular face in using the extrude tool.
Friday, 4 November 2016
UV Mapping
UV Mapping was a struggle and somewhere I would to improve.
I struggled to fix the image and vertices in the correct place as i found every time i moved one vertices another attached to the same point would also move which became increasing frustrating. I understand there are areas of this I could improve and i hope to in the coming weeks.
X-Wing Start
Cockpit
Body was created in a similar way to the TIE-Fighter wing but with extra cuts along the whole body at multiple points. Once done i created a separate object for the cock pit. This was mainly a similar way as the body with just highlighting the correct vertices and moving them to their desired location through a process of cutting around the object multiple times.
I then noticed an indent in the body of where the cockpit stand do to facilitate the cockpit i then duplicated my current cockpit and just transformed across the x-axis, this is so when i boolean difference the cockpit from body it will not cut lower than where my cockpit stands.
Thursday, 3 November 2016
TIE-Fighter Progress part 2
Viewer Right-Side Wing:
Trying to create the wings basic shape was easy, creating a flat cube that is elongated and cut horizontally in the center to create the hexagon. Ctrl + E to extrude the outer face to a smaller shape and extrude once again to push the smaller shape inside the wing. Repeat this process for the inner wing too (not yet completed in example below.)
The detail in the center of the wing used the same process to create the hexagon but the outer face is resized (without extruding) to a smaller shape. Ctrl + D to duplicate the hexagon and resize then place into it proper location.
Finally the 6 parts sticking out of the center. These were cubes elongated with one edge target welded to another edge to create a triangular prism, and then on a triangular face I target welded the 3 vertices to one to create a point. Then duplicated 5 times and pulled each vertices to the right point to translate the image correctly.
Cockpit:
A simple sphere that has been rotated 90 degrees along the y-axis.
Boolean difference the face off to create a cockpit window and then pull he face out.
The top cut off section was booleaned off and then a face was extruded to connect both areas visually. The top vents were created using cubes that were adjusted correctly and booleaned out.
The bottom guns where attached using an circle that had been transformed into an oval.
Viewer Left-Side Wing:
The wing was duplicated and rotated separately. This has not worked well. The solution is to create a group and then rotate.
Wednesday, 2 November 2016
TIE-Fighter Progress
So far I have the wing and the center cockpit sorted. It far has from enough detail but it is a step in the right direction.
Skills I have improved on:
- Extruding in and out.
- Switching between select, translate, rotate and transform (using the Q,W,E,R keys).
Using Multiple Image Planes
While creating the TIE-Fighter I found that the image plane I had chosen was not quite what I wanted in its detail.
There are many benefits to using multiple image planes to create your models such as finding extra detail and re-iterating what is needed to create the source you are studying. But there are drawbacks too such as you will most likely need to resize he plane vertically and horizontally, and that the image plane could be a different variation of the model. With the below example it worked well as i wanted my visual information about the center of the wing.
Subscribe to:
Posts (Atom)